 Learn
EPOCH Install
Learn
EPOCH Install
-
- Version
- 0.1.3
-
- Author
- Exastro Developer
-
- Release date
- 2021/11/10
-
- Last modified
- 2021/11/10
Introduction
Overview
This document serves as a guide to installing Exastro EPOCH (Hereinafter referred to as EPOCH).
- For information regarding the processes after installing EPOCH, please refer to the other documents in the “Install section”.
- This guide does not include information regarding Kubernetes constructions.
System configuration
System configuration diagram
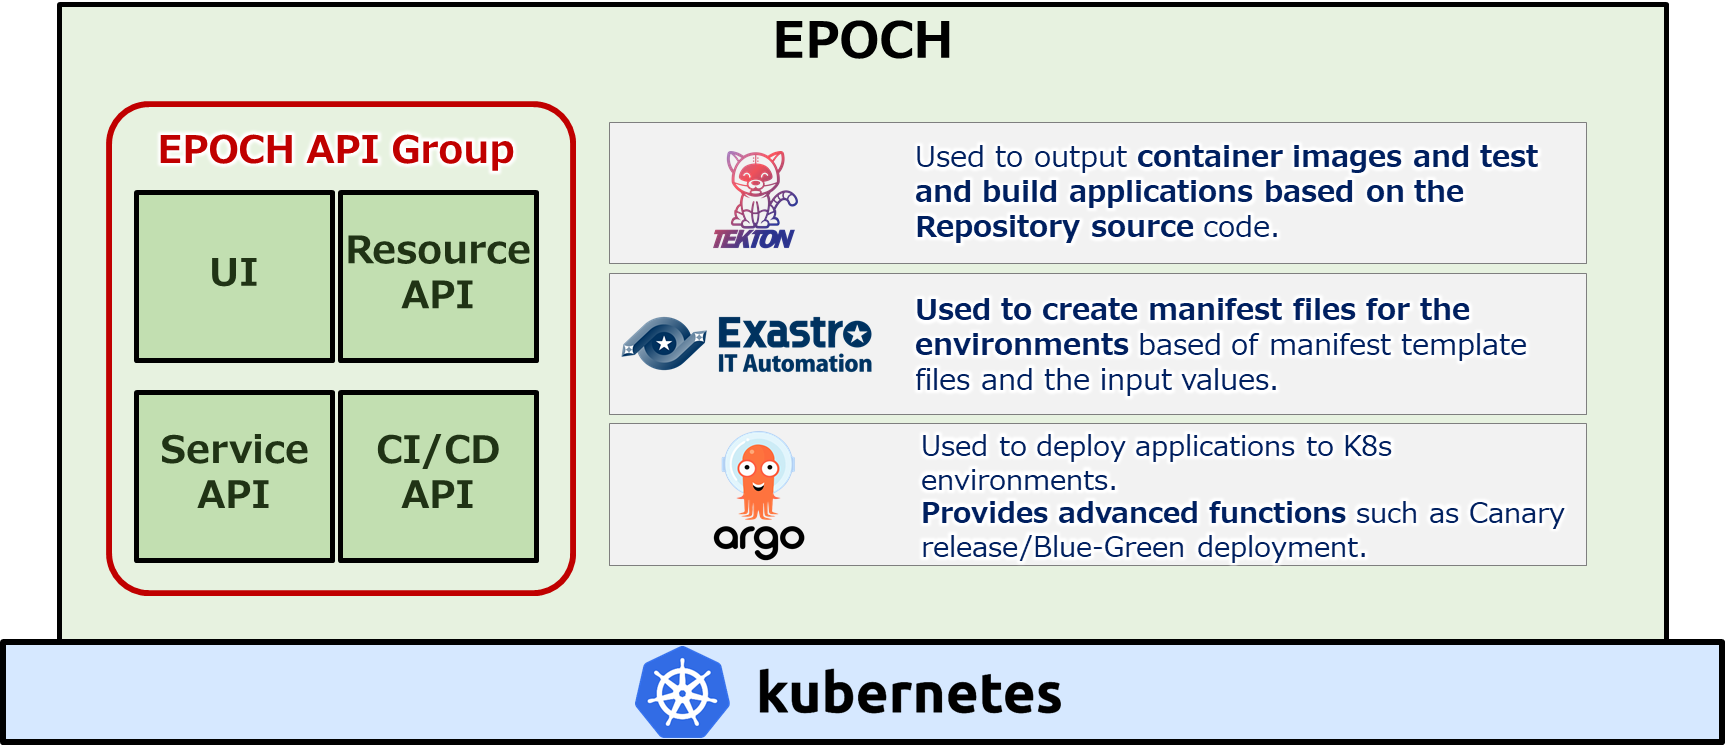
EPOCH is installed by deploying different resources on Kubernetes. The figure below illustrates the overview of an installed EPOCH construction.
Installation requirements
Make sure that the following requirements are me before installing EPOCH on Kubernetes.
- The Kubernetes environment is running on version v1.18 or later.
- The ServiceAccount used in Kubernetes must have the cluster-admin role.
- The user must be able to connect to external ineternet from Kubernetes.
- The Kubernetes environment must be able to use the following port numbers:
- 30080
- 30081
- 30443
- 30801
- 30805
- 30901~30907
The port numbers are defined in the epoch-install.yaml file shown later in the guide. Make sure to install after changing the files.
Minimum required specs
The minimum server specs for the Kubernetes cluster are as following.
The following specs are for1 master node and 1 worker node.
Master node
| CPU | 2 Core (3.0 GHz) |
| Memory | 8GB |
| Disc space | 10GB |
Worker node
| CPU | 2 Core (3.0 GHz) |
| Memory | 8GB |
| Disc space | 32GB |
These specs are values for reference. The final specifications should be determined by considering factors such as the requirements of the final system and whether or not the deployed Kubernetes is different from EPOCH. node.
Installation process
Installation process overview
The EPOCH installation process proceeds by deploying resources on Kubernetes.
Manifest file list
The following list displays the manifest files used when extracting resources.
| Manifest file URL | Overview |
|---|---|
| https://github.com/exastro-suite/epoch/releases/latest/download/epoch-install.yaml | Extracts the EPOCH API group and Tekton. Acquired from the EPOCH repository. |
| https://github.com/exastro-suite/epoch/releases/latest/download/epoch-pv.yaml | Extracts persistent volume used by Tekton pipeline.Acquired from the EPOCH repository. |
| https://github.com/argoproj/argo-rollouts/releases/latest/download/install.yaml | Extracts Argo Rollouts. Acquired from Argo Project’s official repository. |
EPOCH Install process
Installing EPOCH
① Login to an environment with SSH where kubectl can be run, and run the following command to install EPOCH.
kubectl apply -f https://github.com/exastro-suite/epoch/releases/latest/download/epoch-install.yaml
② Run the following command and check that all the Pods are running(EPOCH).
Press ctrl + c to stop monitoring.
kubectl get pod -n epoch-system --watch
Output example
NAME                                                READY   STATUS              RESTARTS        AGE
epoch-cicd-api-*********-*****                      1/1     Running             0               **s
epoch-control-tekton-api-*********-*****            1/1     Running             0               **s
epoch-rs-organization-api-*********-*****           1/1     Running             0               **s
epoch-rs-workspace-api-*********-*****              1/1     Running             0               **s
epoch-service-api-*********-*****                   1/1     Running             0               **s
epoch-ui-*********-*****                            1/1     Running             0               **s
organization-db-*********-*****                     1/1     Running             0               **s
tekton-pipeline-db-*********-*****                  1/1     Running             0               **s
workspace-db-*********-*****                        1/1     Running             0               **s
③ Run the following command and check that all the Pods are running(Tekton).
Press ctrl + c to stop monitoring.
kubectl get pod -n tekton-pipelines --watch
Output example
NAME                                                READY   STATUS              RESTARTS        AGE
tekton-dashboard-*********-*****                    1/1     Running             0               **s
tekton-pipelines-controller-*********-*****         1/1     Running             0               **s
tekton-pipelines-webhook-*********-*****            1/1     Running             0               **s
tekton-triggers-controller-*********-*****          1/1     Running             0               **s
tekton-triggers-core-interceptors-*********-*****   1/1     Running             0               **s
tekton-triggers-webhook-*********-*****             1/1     Running             0               **s
【If the resources were not created correctly】
If the resources could not be created correctly due to duplicate port numbers, etc,
use the command below to delete the resources and do step 1 once you have found the problem.
If the resources were not created correctly
kubectl delete -f https://github.com/exastro-suite/epoch/releases/latest/download/epoch-install.yaml
Create persistent volume
Configure persistent volume that configures the Tekton pipeline
① Acquire the manifest files with the command below:
【For Linux, macOS】
curl -OL https://github.com/exastro-suite/epoch/releases/latest/download/epoch-pv.yaml
【For Windows(Powershell)】
Invoke-WebRequest https://github.com/exastro-suite/epoch/releases/latest/download/epoch-pv.yaml -OutFile epoch-pv.yaml
② Check the Worker node’s host name with the command below:
kubectl get node
Output example
NAME                      STATUS   ROLES                  AGE   VERSION
epoch-kubernetes-master   Ready    control-plane,master   **d   v1.**.*
epoch-kubernetes-worker1  Ready    worker                 **d   v1.**.*
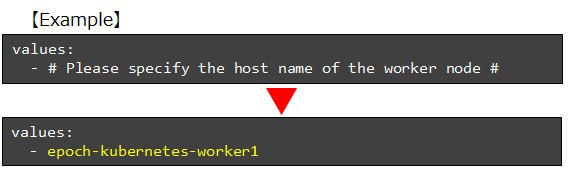
③ Input the Worker node’s host name in the downloaded epoch-py.yaml file.
Change the last line, “# Please specify the host name of the worker node #”, with the worker node’s host name you checked earlier and save the file.
【If there are multiple worker nodes】
It is possible to set the host names for the other nodes.
Specifying hosts for multiple nodes is optional. If more than 1 is specified, the persistent volume will be scheduled for multiple worker nodes.
④ Create persistent volume with the command below:
kubectl apply -f epoch-pv.yaml
⑤ Check that the persistent volume ,”epoch-pv”, has been created with the command below:
kubectl apply -f epoch-pv.yaml
Output example
NAME       CAPACITY   ACCESS MODES   RECLAIM POLICY   STATUS      CLAIM   STORAGECLASS                    REASON   AGE
epoch-pv   500Mi      RWO            Retain           Available           epoch-tekton-pipeline-storage            **s
【If the resources were not created correctly】
If the persistent volume was not created correctly,
use the command below to revert any changes and do step 4 after you have found the problem.
If the resources were not created correctly
kubectl delete -f epoch-pv.yaml
ArgoRollout installation
① Install ArgoRollout with the command below:
kubectl create namespace argo-rollouts
kubectl apply -n argo-rollouts -f https://github.com/argoproj/argo-rollouts/releases/latest/download/install.yaml
② Check that the Manifest file is being displayed correctly with the command below:
kubectl get pod -n argo-rollouts --watch
Output example
NAME                             READY   STATUS    RESTARTS   AGE
argo-rollouts-xxxxxxxxxx-xxxxx   1/1     Running   0          **m
【If the resources were not created correctly】
If the resources were not created correctly、
use the command below to delete the resource and run the「kubectl apply ~」command from step 1 after you have found the problem.
If the resources were not created correctly
kubectl delete -n argo-rollouts -f https://github.com/argoproj/argo-rollouts/releases/latest/download/install.yaml
Connection test
After you have finnished installing EPOCH, connect to the EPOCH workspace screen from your browser. A screen similar to the picture below should be displayed.
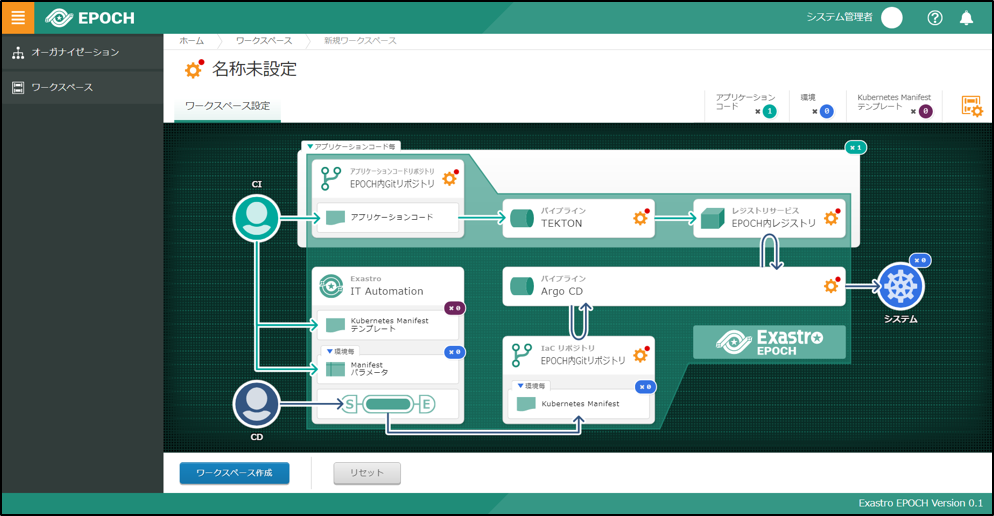
This concludes the EPOCH install guide.